Synchronizing employees through integration with Microsoft Entra (formerly Azure Active Directory) enables automatic data transfer from Microsoft Entra to the tomHRM application.
Rules for synchronizing employees with Microsoft Entra
- Synchronization is automatic and does not require additional action from employees.
- It occurs once a day during the night.
- It is one-way. Data from Azure AD / Microsoft Entra is copied or updated in tomHRM, but synchronization does not occur in the reverse direction. This means that after successful data synchronization, editing an employee’s name in the tomHRM application will not update the employee’s name in the Azure AD (Microsoft Entra) service.
- If an employee in Entra (Azure AD) does not have their first name, last name, or email address filled out, synchronization will not succeed (this information is necessary in the tomHRM system).
The following employee data is mapped and synchronized
- First and last name
- Employee ID
- Office location (in Azure AD, the equivalent of this field is “Office location”)
- Department
- Job Position
- Direct Manager
- Country
- Phone
- Employment date
- System’s language version
Configuration of Employee Synchronization with Microsoft Entra (Azure AD)
The configuration is carried out in two stages:
- On the Microsoft Entra side
- In the tomHRM application
Microsoft Entra Configuration
Step 1
Go to the portal http://portal.azure.com/ and select the Microsoft Entra ID service.
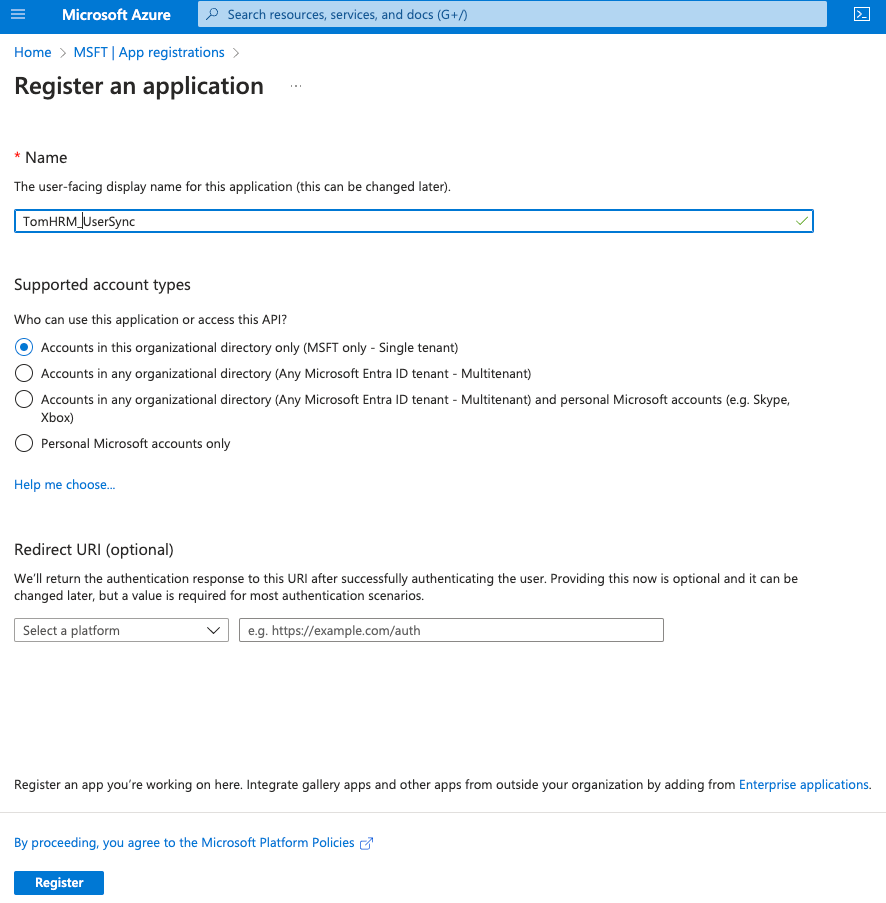
In the left menu, choose App registration, and then select New registration and enter the application’s name (e.g., “UserSync”). Save the settings with the Register button.
Step 2
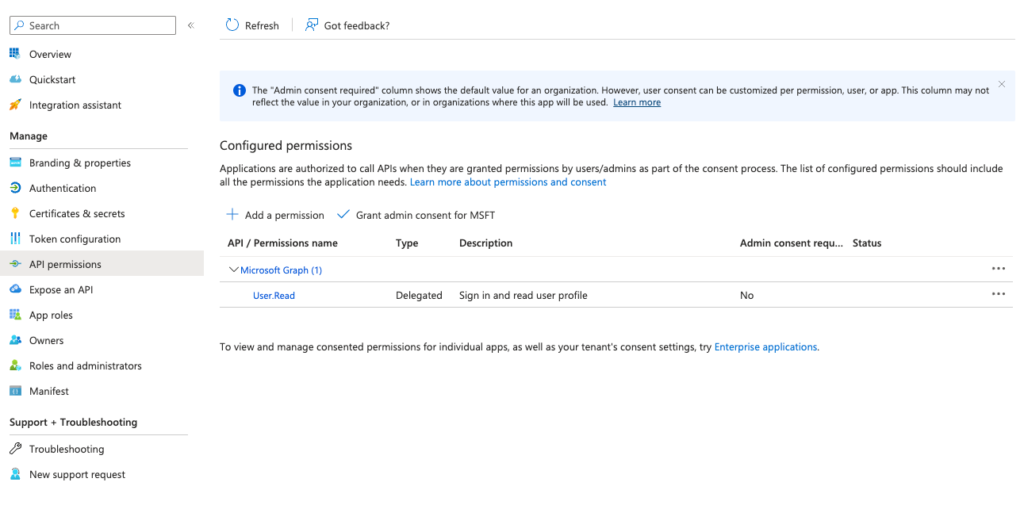
Go to the API Permissions tab within the configuration of the application you just created.
Step 3
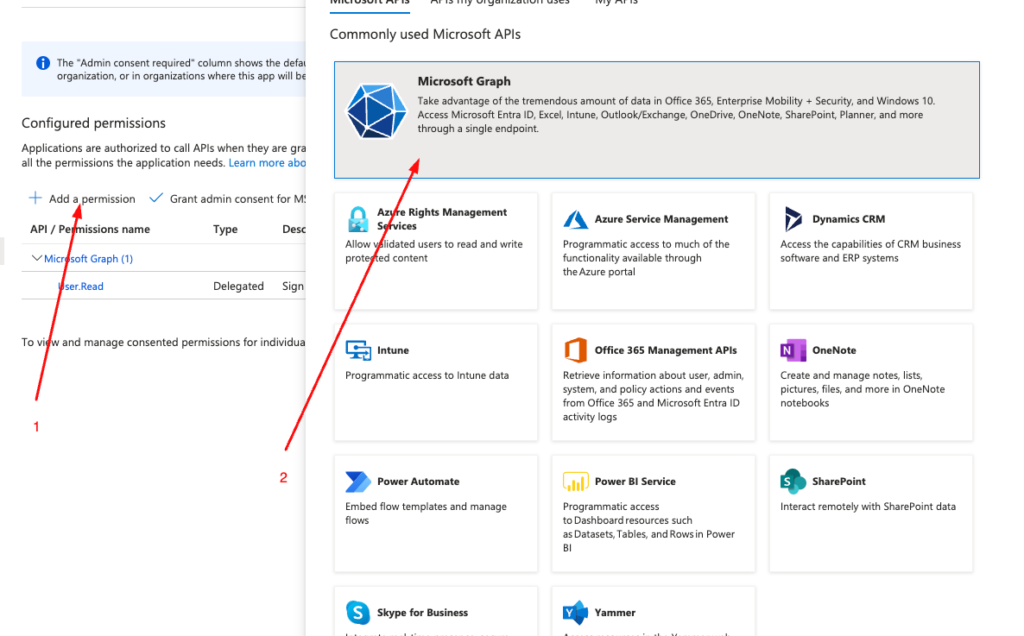
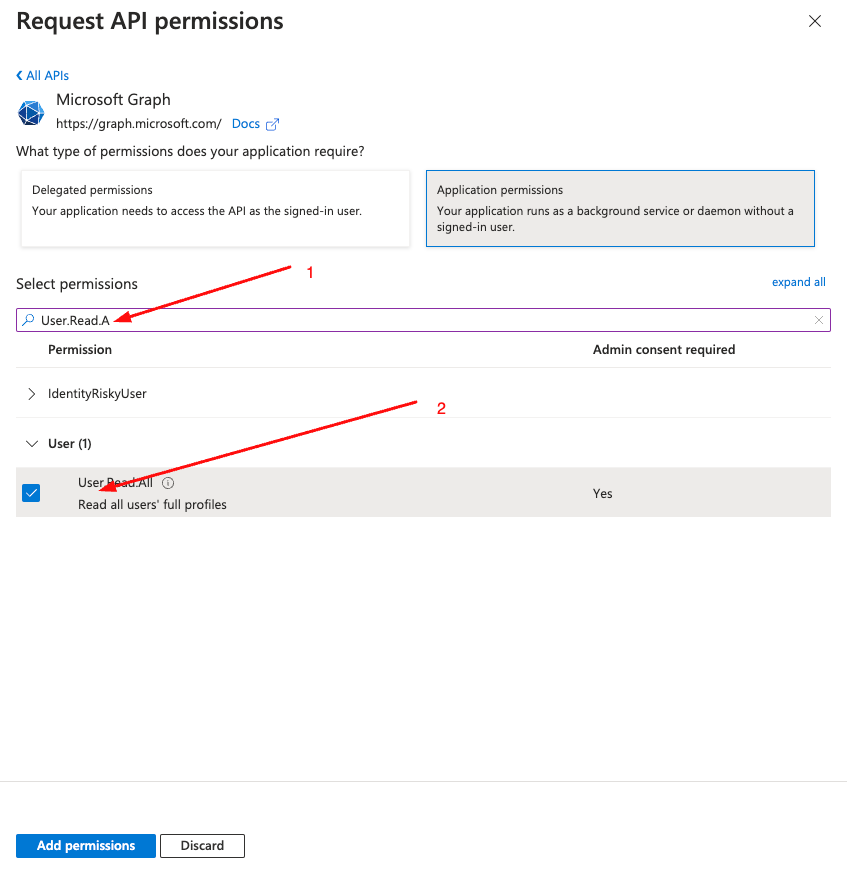
Click Add Permission and select Microsoft graph.
Step 4
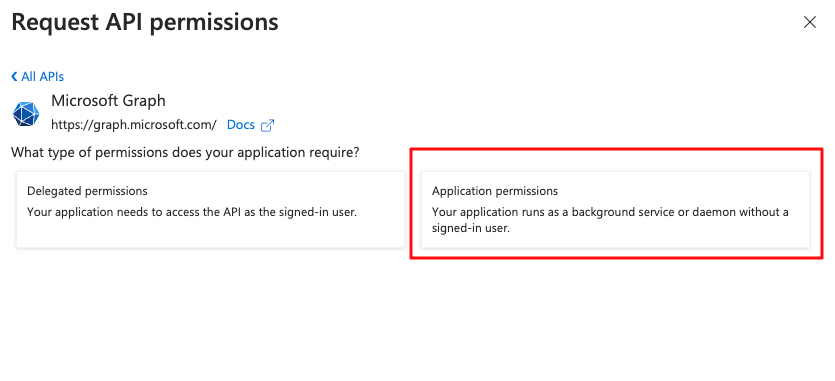
Choose Application Permissions.
Step 5
Among the various permissions available within Microsoft, for the purposes of employee synchronization, you need to add two permissions:
- Read.All
- Directory.Read.All
Search for them, select them, and then click Add Permissions.
Step 6
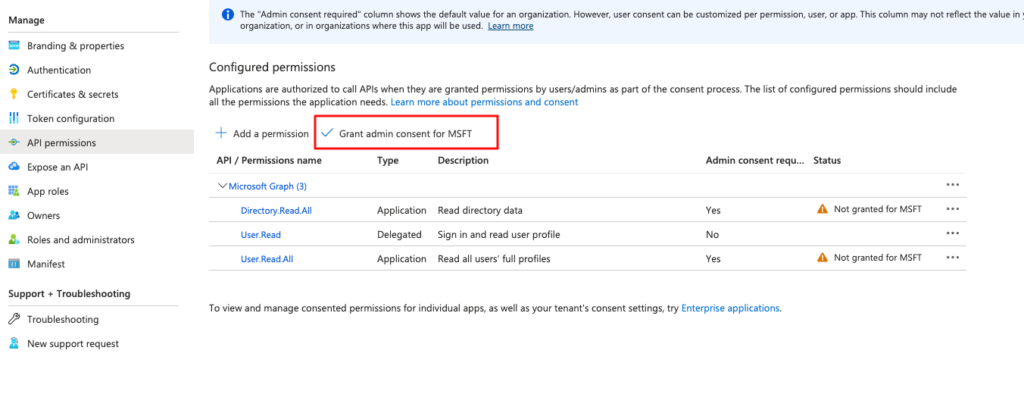
Click the Grant admin for MSFT button.
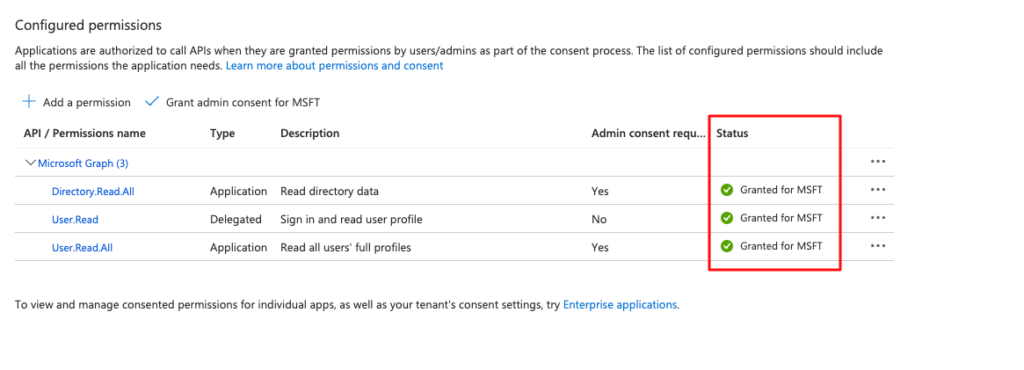
After granting permissions for the administrator, the view of this tab should look like the screenshot below:
Step 7
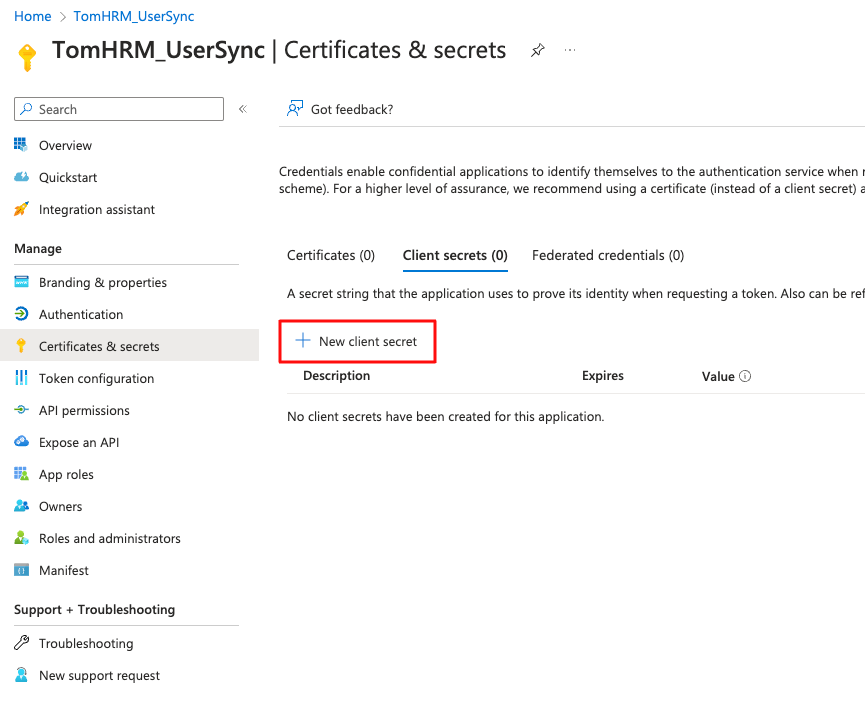
Go to the Certificates & secrets tab and click New client secret.
Step 8
Enter a description for the “client secret” (e.g., UserSync) and set an expiration date for the key. After the set expiration date, synchronization will stop working, and a new “client secret” key will need to be generated and provided in the tomHRM configuration (which will be discussed in the steps below).
Step 9
Copy the key value. This value is shown only once, so it’s necessary to copy and save it immediately in a secure location, such as a password manager.

Step 10
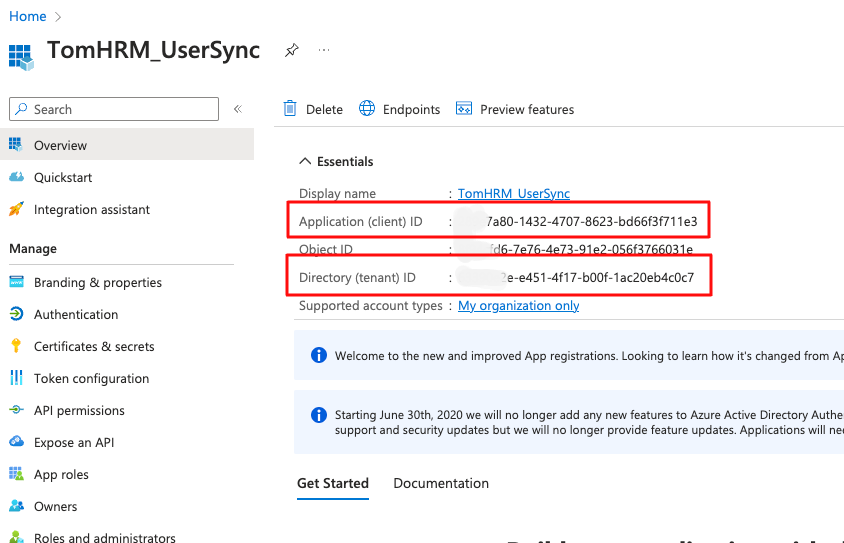
Copy and save the identifying information of the application within the Microsoft Entra infrastructure. To do this, go to the Overview tab and copy the values of Application (client) ID and Directory (tenant) ID.
Configuration of Synchronization in the tomHRM Application
Access to the configuration is only available to the account owner and any person they designate in the configuration (details below).
Step 1 – Starting Configuration
Go to Settings > Parameters > Employees > Employees Sync. and select Azure AD as the service for synchronization.
In this step, you can optionally specify an employee who will have access to the configuration and synchronization history (in addition to the account owner).
Step 2 – Choosing the Default Division
Select the default division when an employee doesn’t have this field completed in Azure AD. If you don’t select a default division, employees without a set division in Azure AD will be skipped during synchronization.
Step 3 – Application Configuration
In the application configuration section, paste the three values copied earlier from Microsoft Azure AD:
- Application Secret
- Application ID
- Directory Tenant ID
Step 4 – Choosing the Default Permission Group
Select the default permission group to be set when adding a new employee. The permission group is not updated in subsequent synchronizations (after the first addition of an employee).
Click Next.
If everything has gone well, you will be redirected to the next step.
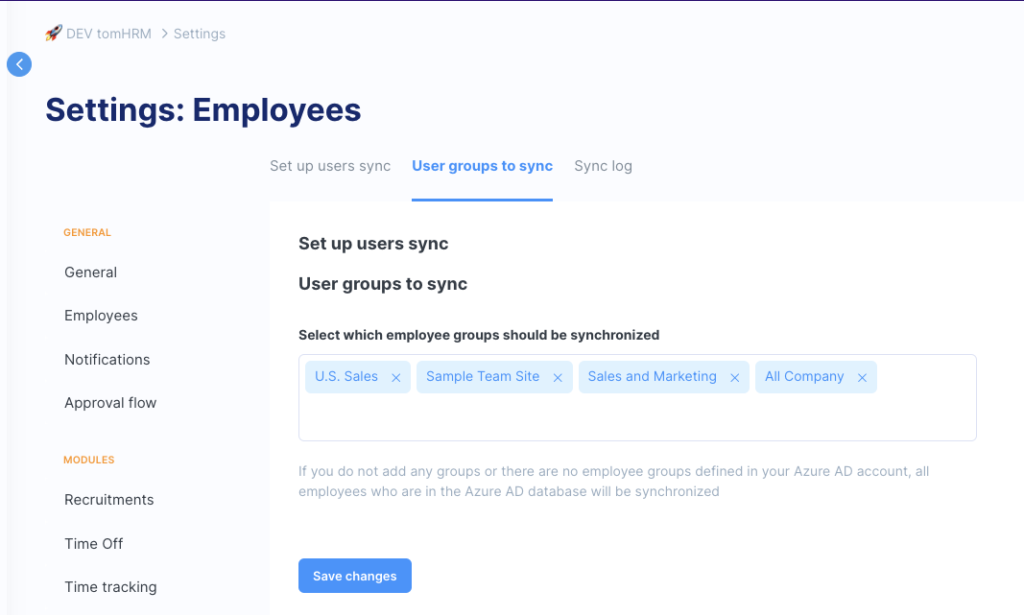
Step 5 – Selecting Employee Groups for Synchronization
In this step, you select which employee groups are subject to synchronization (according to employee groups in Microsoft Azure/Entra). If you don’t select any group, all employees will be subject to synchronization.
Step 6 – Checking the Synchronization
Save the changes. If everything has proceeded correctly, the system will display a message confirming successful configuration.
You can disable synchronization at any time using the Turn off employees sync button.
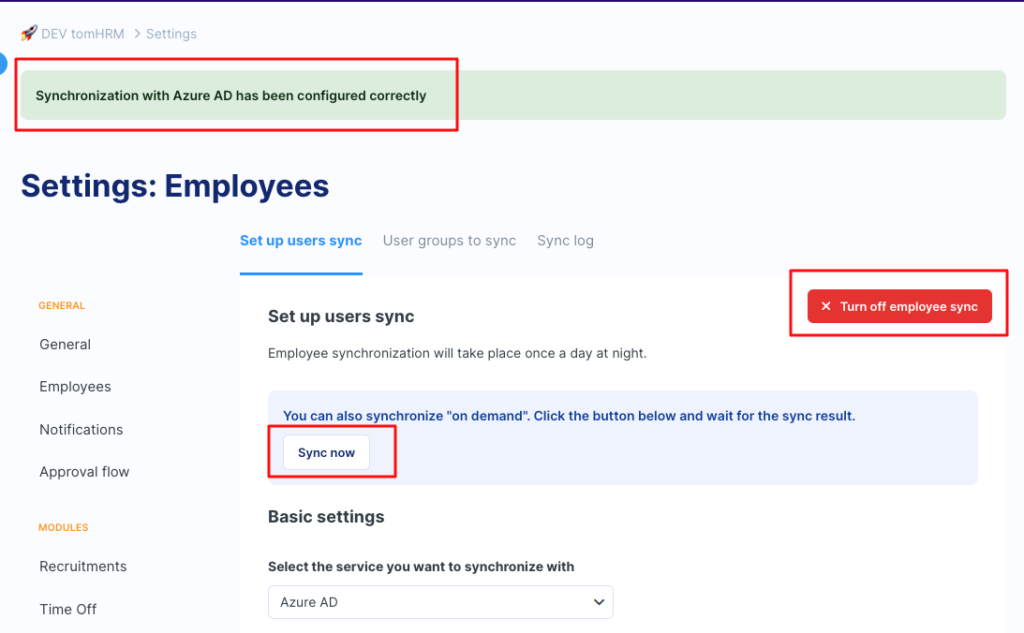
Synchronization information is recorded in a separate Sync Log tab.

